For the complete documentation index, see llms.txt.

Changelog

What's new

Product updates for Starshipit Shipping and WMS.

54 updates

  1. Starshipit Shipping
    new

    AMS eGroup is available in Starshipit for eligible international freight shipments. Connect your AMS eGroup account to create single- and multi-package shipments, print carrier labels and receive parcel-level tracking updates.

    You need your AMS eGroup account number, client ID and client secret. Service and rate availability depend on your account and the selected route. AMS eGroup provides scheduled collections, so there is no separate manifest or close-out step.

    See Set up AMS eGroup to get connected.

  2. Starshipit Shipping
    improved

    Shopify Classic and Enhanced can now import orders in the currency your customer paid at checkout, also known as presentment currency. Matching order, item, shipping, discount, tax, and duty values are imported together, so you can keep the customer's checkout currency and values for invoices and customs information.

    Shopify store currency remains the default. You can opt into Customer checkout currency using Import order values using in your Shopify integration settings. If Shopify's checkout-currency data is incomplete or inconsistent, Starshipit uses the complete store-currency set instead.

    This setting does not convert currencies or check whether your carrier supports the imported currency. Australia Post's standard international customs flow requires values in AUD. Before printing, confirm that both the currency and the amounts meet your carrier's requirements. Unsupported currencies may be declared or displayed incorrectly by a carrier, and this setting does not block label creation.

    See Configure Shopify order import for setup steps, the fallback behaviour, and a test-order check.

  3. Starshipit Shipping
    new

    We’re moving customers using UI 2.0 to an updated experience that keeps familiar shipping workflows while delivering faster, more responsive performance. The migration is already underway, and UI 2.0 will no longer be available once it is complete.

    You don’t need to take any action. We’ll move your account as part of the rollout. To move sooner, visit next.starshipit.com, go to Settings > Interface, set UI version to New UI and New UI version to UI 2.5 (recommended), then click Save. Classic UI users are not included in this migration.

    Alongside improved performance, the updated interface includes several practical improvements.

    What’s new?

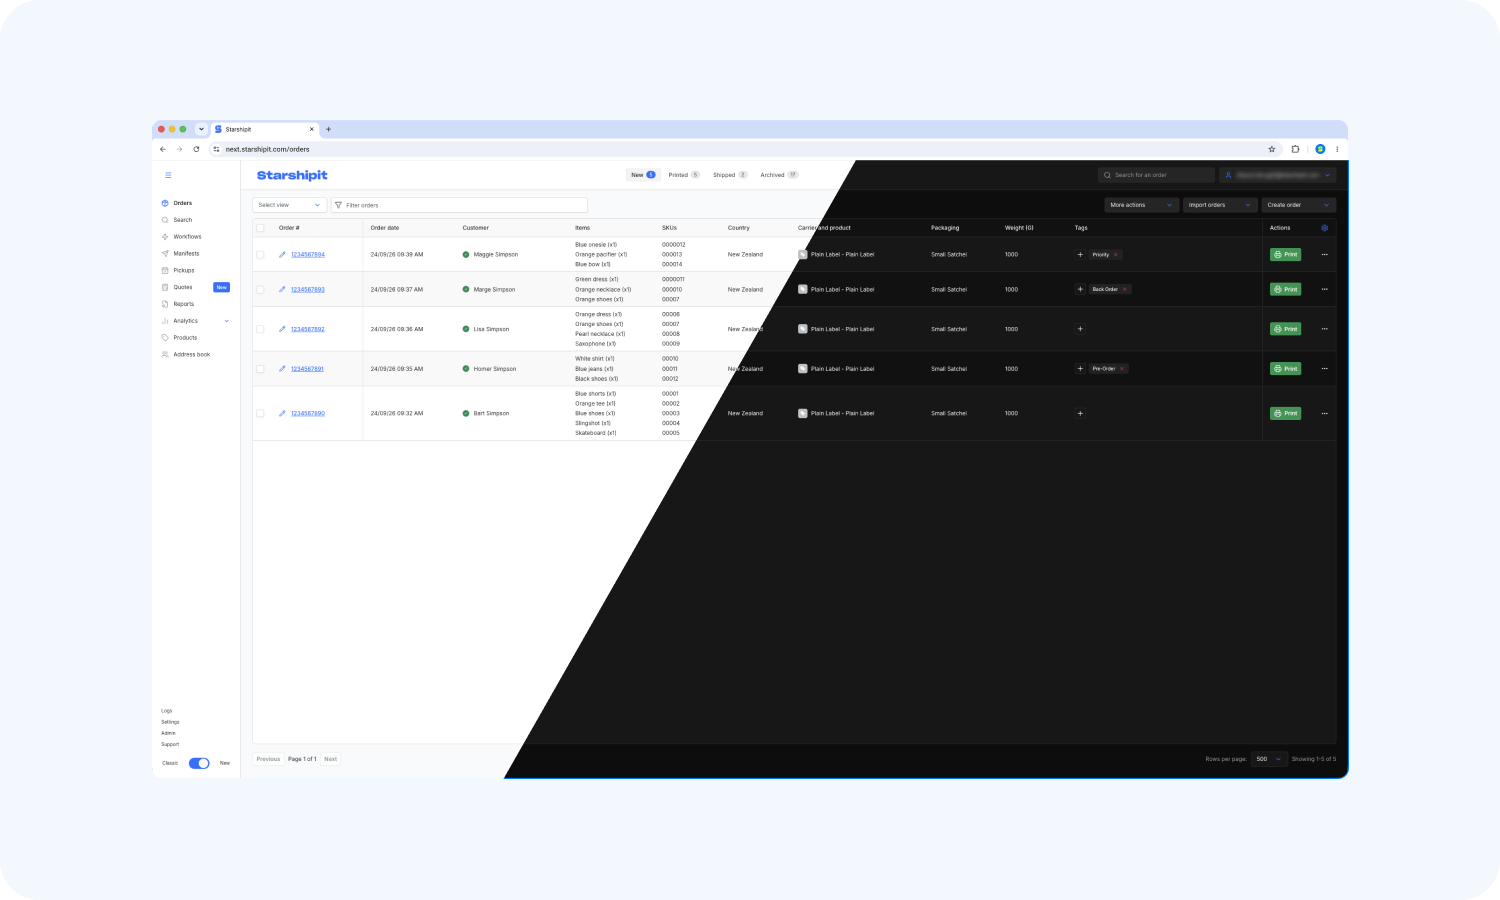
    Orders grid shown in light and dark mode

    Personalise your workspace

    • Choose light or dark mode and adjust zoom from the user menu in the top-right corner.
    • Hide menu items you don’t need, choose a saved view to open in the Orders Grid by default, and manage the optional Enter-to-print shortcut from Order details in Settings > Interface.
    • Choose up to 500 orders per page from the page-size control at the bottom of the Orders grid.

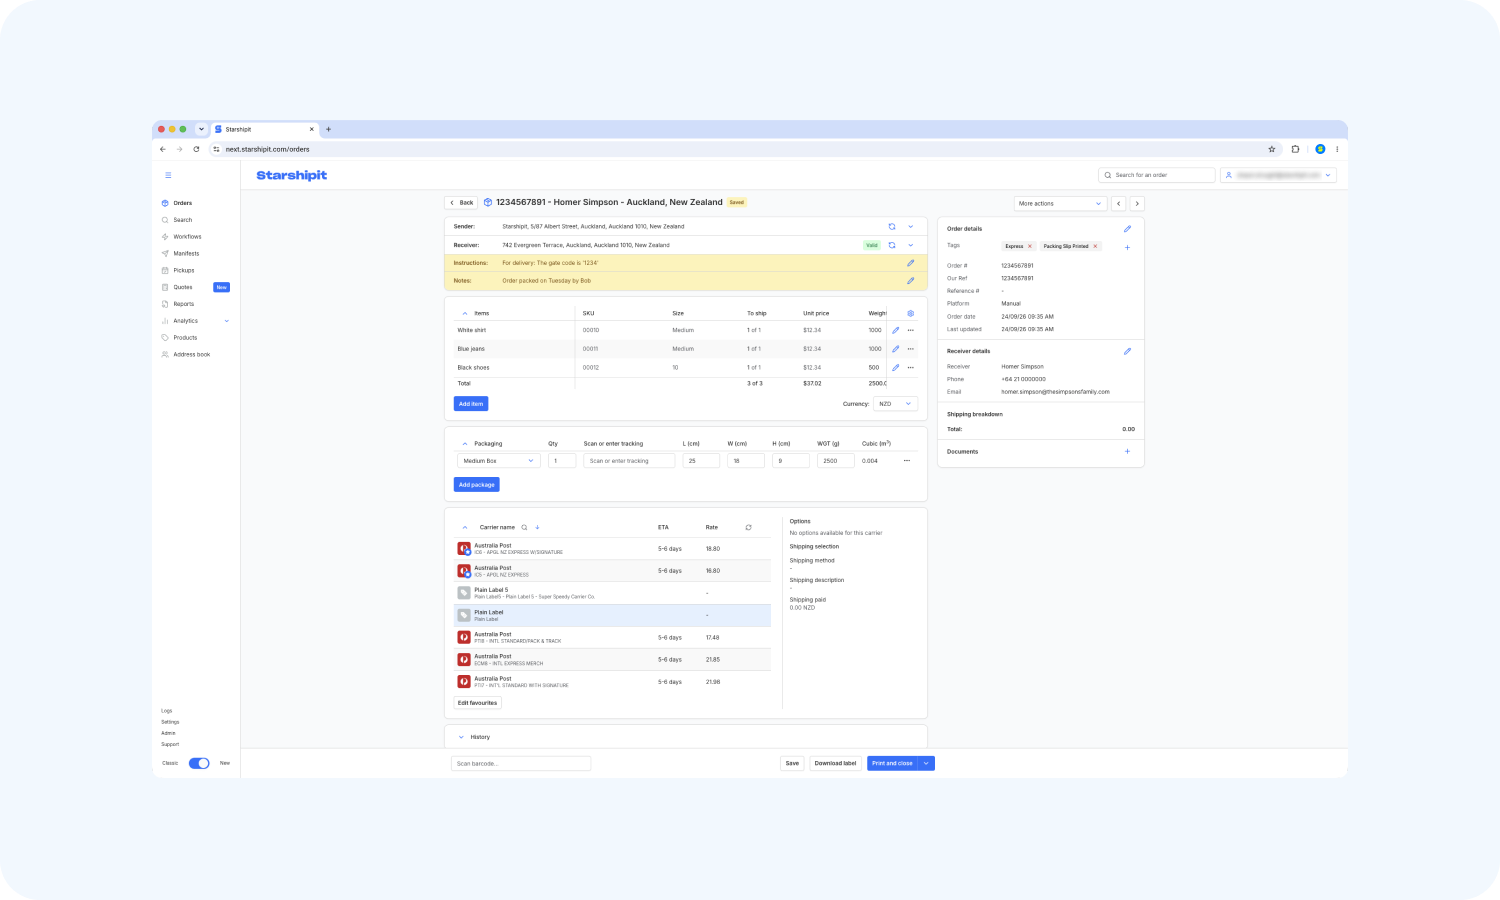
    Order details page showing items, packages, and carrier rates

    Manage orders more efficiently

    • Review key information, including carriers and rates, higher on the Order details page with less scrolling. Collapse Items and Packages when you don’t need them.
    • See the order ID in your browser tab when working across multiple orders.
    • When an address is invalid, select Correct address from Order details to review suggested matches, search for an address, and apply a correction.

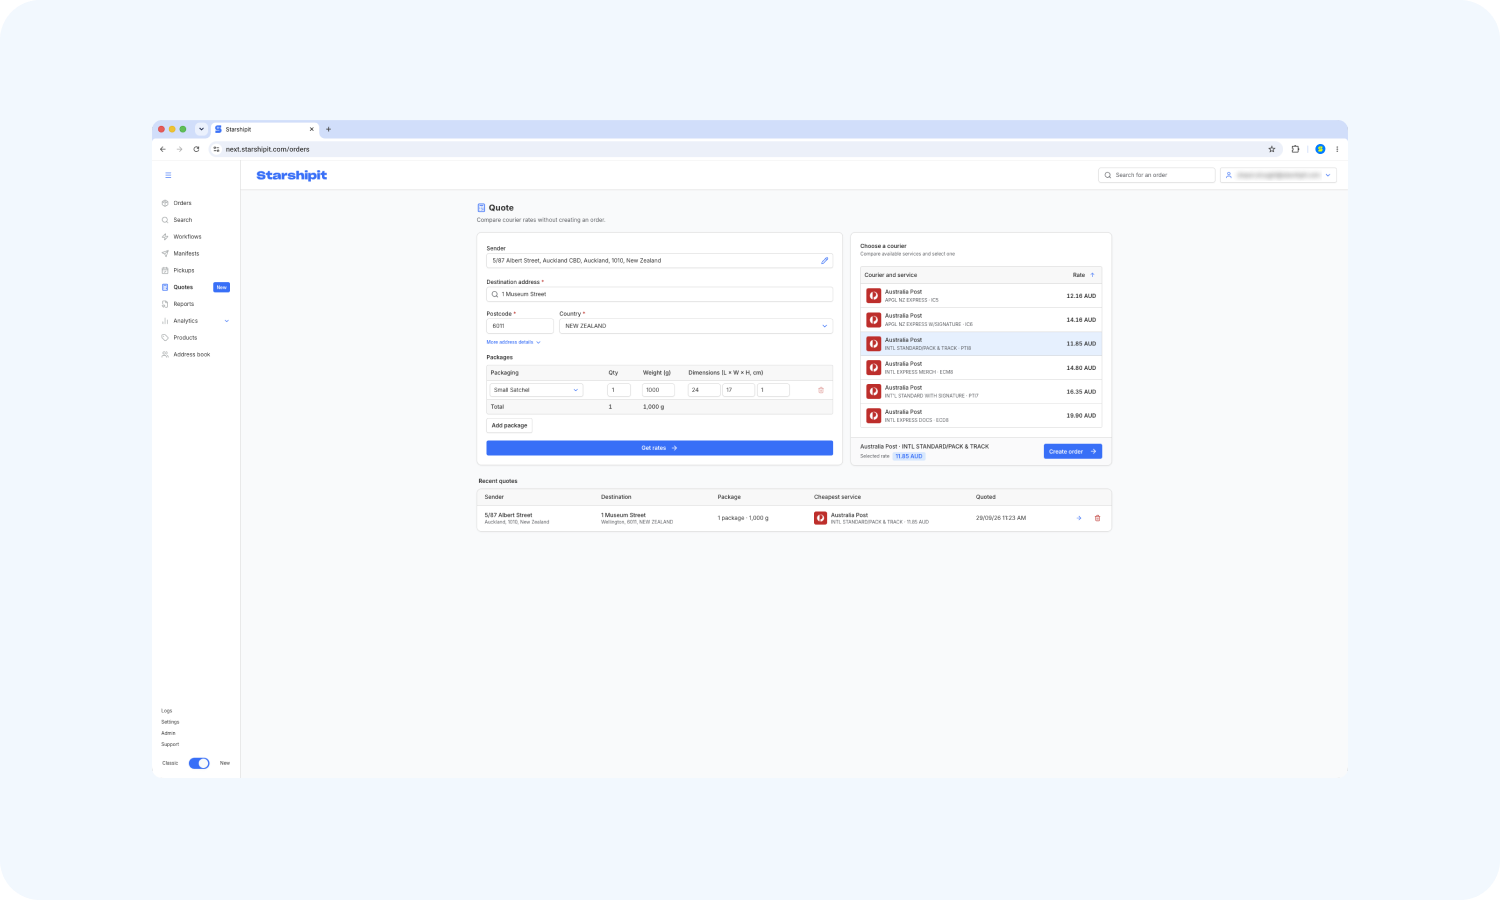
    Quotes page showing carrier rates and recent quotes

    Compare carrier rates before creating an order, and more

    • Open Quotes from the main navigation to compare carrier rates before creating an order.
    • Create sample orders from the Orders grid by selecting Import orders > Load test orders, so you can test or demonstrate your order and printing workflows without using live orders.
    • Reorder rules by dragging them or using keyboard controls in Settings > Rules.
    • Pages adapt more effectively across different screen sizes.
    • Search for packing slip and packing summary variables, then hover over them to see what they do.
    • Find couriers, integrations, report types, and more quickly with search, instead of scrolling through long lists.

    What’s changed?

    Some familiar controls have moved to make them easier to find and manage:

    • Column order is now managed from the column options menu within the Orders grid, rather than by dragging columns directly in the grid. Your selected columns from UI 2.0 won’t carry over, so you’ll need to set them up again after migration.
    • Choosing between Compact and Expanded Orders grid layouts has moved to Settings > Interface. Compact shows each order on one line, while Expanded separates items, SKUs, and bin locations across multiple lines.

    If you need help after moving to the updated interface, contact our friendly support team.

  4. Starshipit Shipping
    new

    iMile Delivery is available in Starshipit for eligible Australian domestic shipments. Connect your merchant account and add the product codes enabled for your account to access contracted rates, create PDF labels and receive tracking information against your orders. After creating labels, select the shipments and book a pickup for a date and time that suits you.

    You need an iMile Client code and Secret key. Add the product codes enabled for your account in the Product codes table. iMile must configure your services and contracted rates for the lanes you want to ship.

    See Set up iMile Delivery to get connected.

  5. Starshipit Shipping
    new

    You can now compare carrier rates from the dedicated Quotes page in UI 2.0 without creating an order first.

    Open Quotes from the main menu on the left, then enter the destination and package details to see the available services and rates from your connected carriers. It is a faster way to prepare shipping estimates or test rates before processing an order.

    The Quotes page also supports:

    • Address autocomplete
    • Multiple packages using your saved packaging
    • Recent quote history stored in your browser
    • Creating an order directly from a quote

    See Use the Quotes page to compare carrier rates for step-by-step instructions.

  6. Starshipit Shipping
    improved

    Cin7 Core can now notify Starshipit when a sale becomes eligible for import. This lets new eligible orders import without waiting for the next scheduled import run.

    To use webhooks, connect Cin7 Core with API Version 2, enable the Cin7 Core Automation module, and subscribe from the Cin7 Core integration settings in Starshipit. Your existing import statuses and settings still decide which sales can import.

    Webhook imports apply to newly eligible orders only. Existing orders are not updated. If you use Advanced Sales, API Version 2 can also import individual sale fulfilments instead of the overall sale.

    See Connect Cin7 Core to Starshipit for the subscription steps and import options.

  7. Starshipit Shipping
    new

    IncaPost is now available in Starshipit for eligible Australian domestic shipments. Connect your IncaPost account to access available services, create labels, and receive tracking information against your orders.

    You need an IncaPost API key with permission to get rates and create orders. IncaPost service availability depends on your account and whether the sender and delivery postcodes are within its supported service area.

    See Set up IncaPost to get connected.

  8. Starshipit Shipping
    improved

    This release gives your team more control over high-volume picking, FedEx packaging, packing documents, and delivery workflows.

    Show more items while picking and packing

    Pick & Pack now has an opt-in Compact item rows setting. It reduces row spacing and text size so more items are visible at once on high-line-count orders, while keeping the item details and pick, pack, and quantity controls you need.

    See Set up Starshipit Pick & Pack mobile app.

    Map imported packages to FedEx packaging

    You can now map an imported package name or package type to the appropriate FedEx packaging option. This helps apply the right FedEx packaging when your orders use more than one package preset.

    See Configure FedEx product codes and packaging.

    Make packing-slip updates with more control

    Packing-slip logos are saved more reliably. In the template editor, merged cells and your current editing state are also retained when you make changes, and you can now unmerge cells when adjusting a layout.

    See Configure packing slips using the template editor.

    Apply NZ Post dangerous goods by product

    For NZ Post shipments, dangerous-goods details can now be selected from the products on an order. This helps ensure the relevant dangerous-goods information is applied when orders contain eligible products, while still supporting your existing tag and rule-based setup.

    See Set up dangerous goods for NZ Post.

    Add customer details to Pickup in Store labels

    Pickup in Store label templates now include customer contact variables, giving collection teams more flexibility in the information they print for an order.

    See Enable Pickup in Store and configure labels.