This guide is for third-party logistics providers (3PLs) using Starshipit WMS to fulfil orders on behalf of multiple client brands from a shared warehouse. It walks through the two main setup options and helps you decide which fits your operation.
The core decision: one instance or many?
The most important setup choice for a 3PL is whether to run:
- One WMS instance - connected to a single Starshipit parent account, with a 3PL child account per client brand, or
- Multiple WMS instances - separate WMS environments connected through 3PL child accounts for each client brand or location.
Both are fully supported. The right choice depends on how you prefer to operate day-to-day.
Comparison
| Single instance | Multiple instances | |
|---|---|---|
| Starshipit setup | One Starshipit subscription with a parent account and a 3PL child account per client brand | One Starshipit subscription with a parent account and 3PL child accounts for each client brand or location |
| WMS instances | One shared WMS instance | Separate WMS instances by client brand or location |
| Operator experience | All clients in one interface | Switch between instances to change context |
| Cross-client pick runs | Yes - pick orders across all clients in one job | No - each instance operates independently |
| Inventory view | All clients visible together; segregated by zone | Fully isolated per instance |
| Client self-service login | Not recommended - clients would see all brands' data | Yes - each client logs into their own WMS |
| Inventory segregation method | Zones or unique SKUs | Native isolation - each instance tracks its own stock |
| WMS billing | One plan covers all clients | One plan covers all clients |
| Best for | 3PLs who want to work from one screen, run combined pick runs, and manage all clients centrally | 3PLs who need clean client data separation, or where clients need direct WMS access |
Option 1: Single WMS instance
How it works
You run one Starshipit parent account. Each client brand has its own 3PL child account in Starshipit, which holds their store integrations, orders, and carrier configuration. All child accounts point to a single Starshipit WMS instance.
Orders from every child account flow into WMS and can be released, picked, and packed from one place. Critically, you can create pick runs that span all client orders at once - a significant efficiency advantage in a high-volume fulfilment centre.
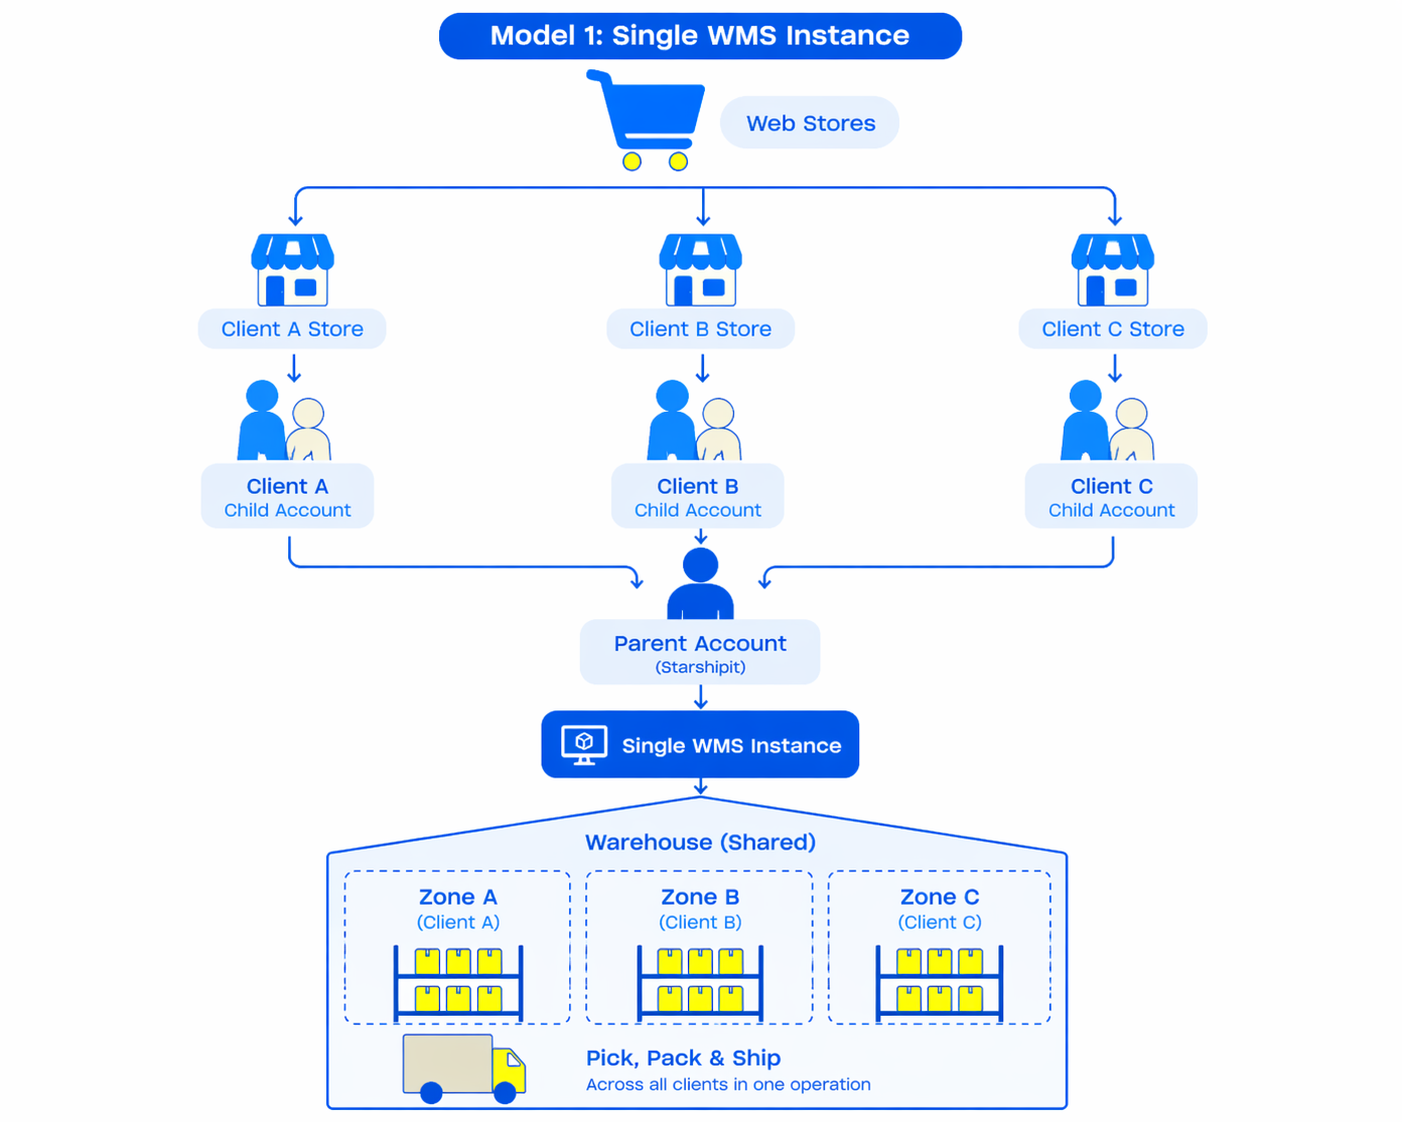
Keeping client inventory separate
WMS includes Zones to group warehouse locations and the products assigned to them. You create one zone per client brand, then assign that client's products and storage locations to their zone.
This means:
- Client A's stock is stored and tracked within Zone A.
- Client B's stock is tracked within Zone B.
- Stock movements, inventory figures, and pick jobs respect zone boundaries.
If all your clients use unique SKUs - which is common in 3PL environments - zones are optional. WMS will track each SKU's stock accurately without them. Use zones when you want a clear physical or reporting separation between client stock, or as a safeguard if there is any risk of SKU overlap between clients.
See Locations and warehouse setup for how to create and configure zones and locations.
Limitations
- No client self-service login. If a client logs into WMS in a shared instance, they would see stock and orders for all brands. If clients need independent access to their own data, the multi-instance model is the better fit.
- Single shared view. All inventory, orders, and locations are visible together. Clear zone and location naming conventions are important so your team can instantly identify which stock belongs to which client.
Setup overview
- Create child accounts in your Starshipit parent account - one per client brand. Connect each child account to the client's ecommerce store (e.g. Shopify, WooCommerce).
- Enable WMS on your Starshipit parent account and complete the initial warehouse setup. See How to set up Starshipit WMS for the full steps.
- Enable the WMS integration on every child account. In each child account's WMS integration settings, use the WMS Override option to select the parent account. This tells the parent account's WMS instance to track orders from that child account.
- Create a zone per client in WMS. Navigate to Warehouse configuration > Zones and create a zone for each client brand.
- Create or assign locations to each zone. Each location should belong to the zone of the client whose stock is stored there.
- Assign products to zones. When configuring products in WMS, set the zone for each client's SKUs.
- Orders from all child accounts will flow automatically into the single WMS instance. Your team can work across all client orders from one screen.
Option 2: Multiple WMS instances
How it works
You run separate WMS instances through child accounts under the same Starshipit subscription. This is usually used when each client brand or warehouse location needs its own WMS environment. You manage the setup and configuration for all instances, but switch between them when working on a specific client's orders.
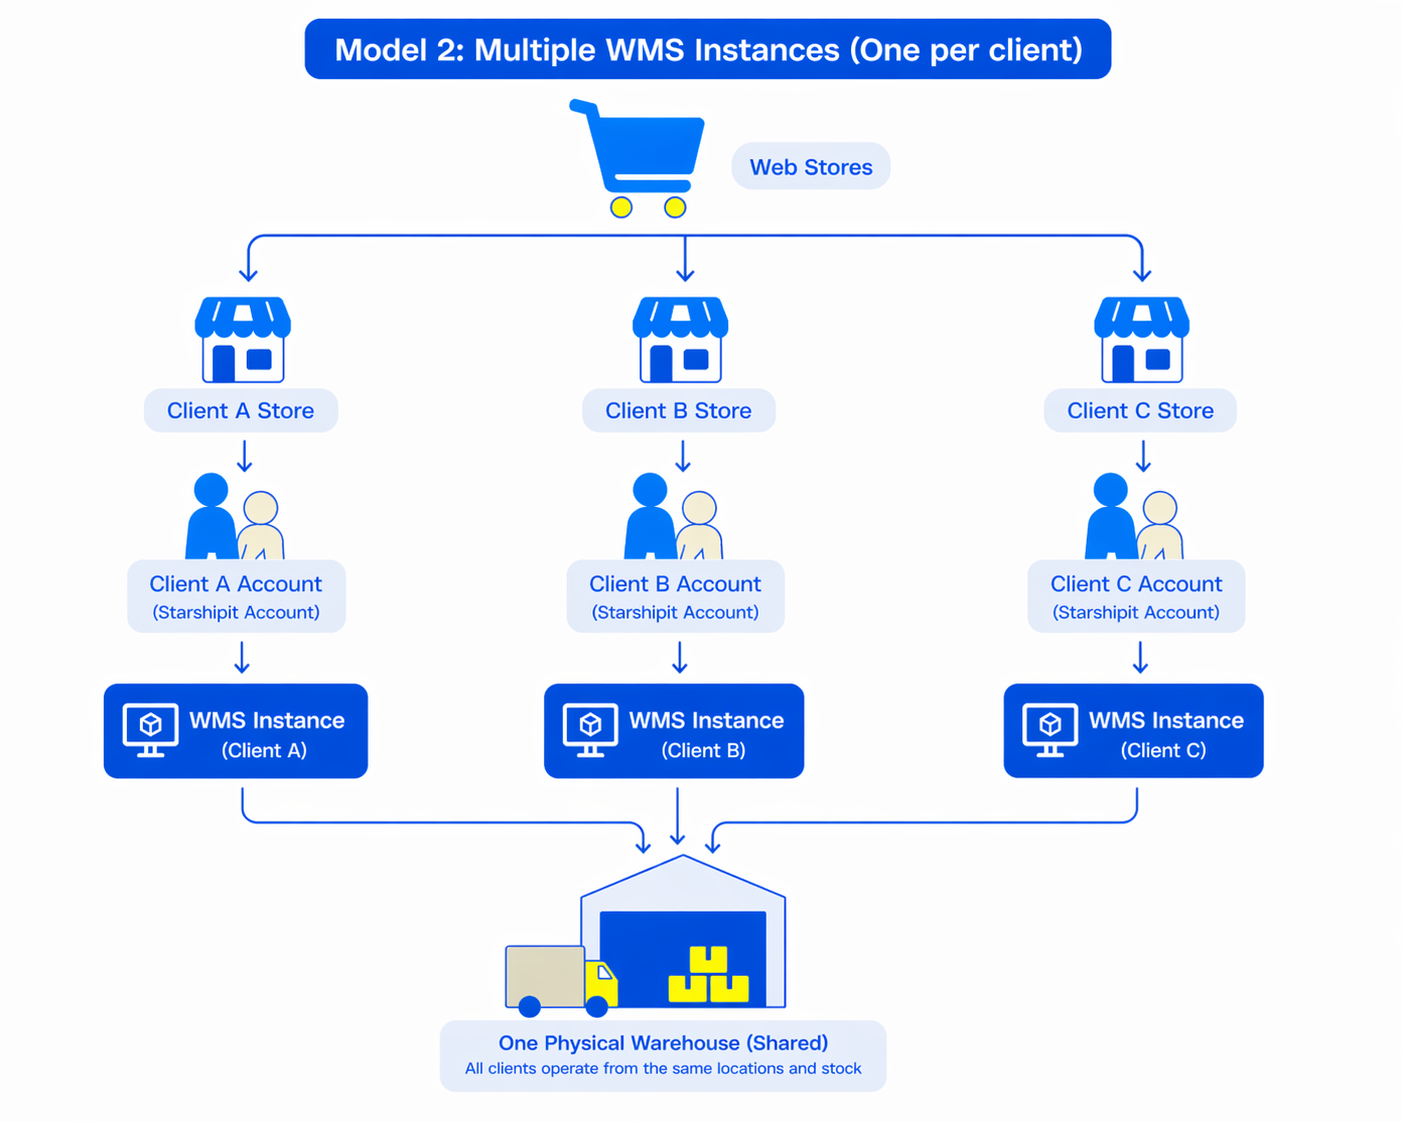
Keeping client inventory separate
Each WMS instance maintains completely independent inventory, location, and order data. There is no shared view across instances and no risk of data bleed between clients. This is the cleanest segregation available.
Limitations
- No cross-client pick runs. Orders from different clients cannot be combined into a single pick job. Each instance operates independently, so your warehouse team must work in one client's instance at a time.
- Context switching. Your team needs to log into - or switch to - the correct WMS instance when working on a specific client's orders. In a high-volume environment, this can add friction.
- Single subscription management. The 3PL still manages one Starshipit subscription, with child accounts used to separate brands, clients, or locations.
Setup overview
- Create child accounts for each client brand or location that needs its own WMS instance. Connect each child account to the relevant ecommerce store.
- Enable WMS on each child account and complete the initial warehouse setup for that WMS instance.
- Configure locations, products, and settings for each instance as needed for that client or location's operation.
- Repeat for each client brand or location. Each WMS instance is fully self-contained.
FAQ
Yes - but only in a multi-instance setup. Each client would log into their own dedicated WMS instance. In a single-instance setup, a client logging in would see all brands' data, so it is not recommended.
In practice this is uncommon, since most clients use their own SKU conventions. If SKUs do overlap, zones provide a clean solution: the same SKU assigned to two different zones is tracked as separate stock pools. If SKU conflicts are likely or unavoidable, consider a multi-instance setup instead.
In a 3PL context, the 3PL operator is responsible for all WMS setup and ongoing configuration. Clients do not typically manage WMS themselves.
It depends on how you prefer to operate. Single instance suits 3PLs who want to work from one screen, benefit from combined pick runs, and manage all clients centrally. Multiple instances suit 3PLs where client data privacy is a priority, or where individual clients need direct WMS access to their own data.