# Peoplevox Integration
URL: https://support.starshipit.com/articles/360000934795-peoplevox-integration
Canonical: https://support.starshipit.com/articles/360000934795-peoplevox-integration
Markdown: https://support.starshipit.com/articles/360000934795-peoplevox-integration.md
Updated: 2026-05-06
> For the complete documentation index, see [llms.txt](https://support.starshipit.com/llms.txt).
> Integrate Peoplevox, a cloud-based warehouse management system, with Starshipit to manage warehouse operations and inventory efficiently.
Peoplevox is a cloud-based warehouse management system that helps eCommerce businesses manage their warehouse operations efficiently and provides tools for inventory management.
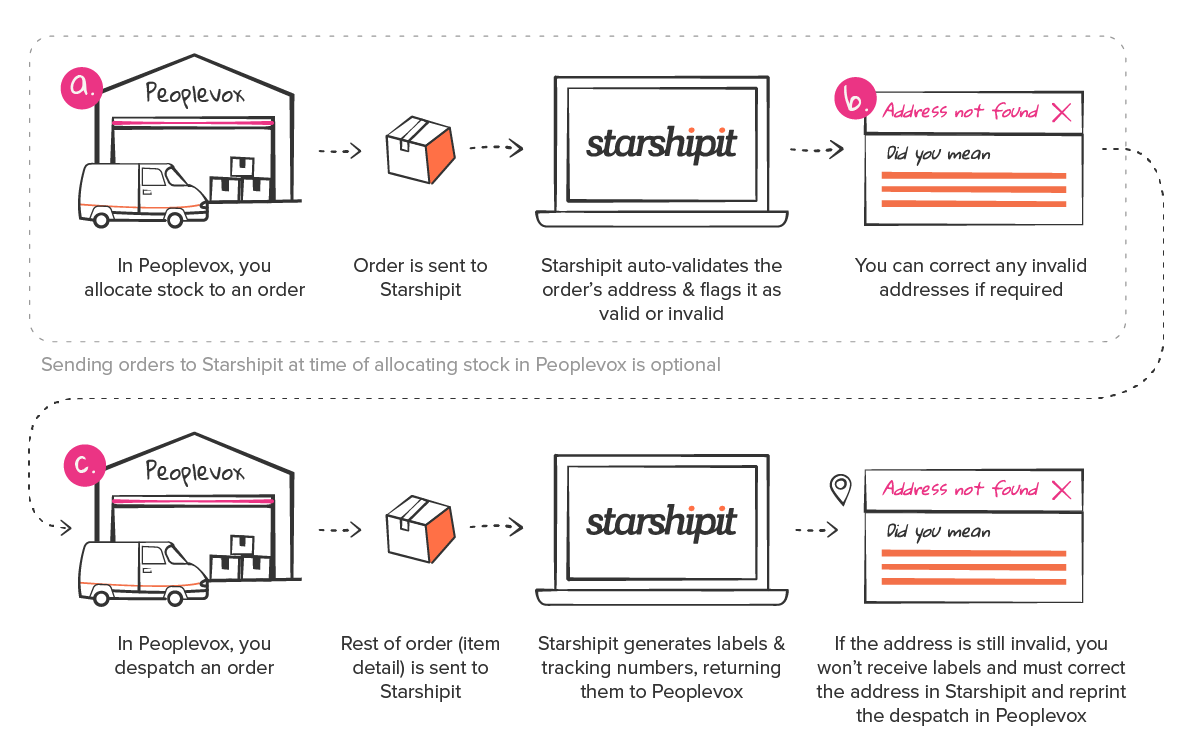
* **A.** When you allocate stock in Peoplevox, orders will be pushed across to the New section in Starshipit.
* **B.** Once orders arrive in New, you will have the chance to correct any address issues in Starshipit. **(only if need be)**
* **C.** When a despatch is done in Peoplevox this will pass across item details, allowing Starshipit to generate labels and tracking numbers and return them to Peoplevox.
:::warning
NotePeoplevox may charge an extra subscription fee for enabling theircarrier integrationmodule (which they require for us to integrate with them - seepoint 3below). You can contact their support teamhere.
:::
## 1. Set up Peoplevox
There are some overall required settings for using Starshipit with Peoplevox.
1. In Starshipit, navigate to **Settings** > **Integrations**.
2. Click **Add a new integration**, and select **Peoplevox** from the list.
3. Enter a **display name** for your integration (e.g. Peoplevox).
4. Select the **region** where your Peoplevox instance is sited from the options presented (this will reflect in the URL used to access your Peoplevox instance, e.g. ):
* Americas (US)
* Asia Pacific (AP)
* Europe (WMS)
You can also choose from where Starshipit picks up the following fields when importing from Peoplevox (in most cases you set these to one of the **attributes 1-5** on the **sales order** in Peoplevox, depending upon your particular Peoplevox setup). This applies for orders imported at both allocate stock and despatch time.
1. Company name
2. Building
3. Phone number
4. Currency code
5. Delivery instructions
In addition, attributes 1-15 can be setup for **HS Code** and **Country of Manufacture**.
## 2. Set up an optional subscription to receive orders at stock allocation time
Receive orders at the time of inventory allocation in Peoplevox (this is optional, but means you have an earlier chance to correct invalid addresses).
1. In Starshipit, enter the **Client Id**, **Username** and **Password** that you use to log in to Peoplevox.
2. Enter **Requested Delivery Date**, after which orders will import from Peoplevox (based on the stock allocation time event there)
* This prevents historical orders from being imported, so simply set to a recent date
3. Click **Save**.
4. Click **Test to ensure it works**. You'll see **Successful** at the page bottom, if the connection works.
5. To enable orders to be sent over from Peoplevox when you allocate stock to them, click **Subscribe.**
## 3. Set up 'carrier integration' access in Peoplevox
Receive order detail at the time of despatch in Peoplevox, so you can print labels and return them and their tracking numbers to Peoplevox.
1. Log into your Peoplevox account.
2. In the top-right of the screen, change the view to **Integration**.
3. In the header, select **Carrier Integration**.
4. Click **Add New** (or if you already have a **previous Starshipit integration**, you can just **change the Api key ONLY** in this set of steps, as one integration is sufficient).
5. Set **Name** as 'Starshipit'.
6. Set **Date time format** as dd/MM/yyyy hh:mm:ss.
7. Set **Timeout (ms)** as 30000.
8. Copy and paste the **Api key** from your Starshipit account's **Settings > Integrations > Peoplevox**page.
1. If you haven't needed anything to do with Api keys in Starshipit before, then you may not have the full Api key here yet (it may just be something like **123456;**), whereas you actually need the full Api key (something like **123456;99999a999999999a9a9a999aaa99a9a9**).
2. In this case, first go to **Settings > API** and click the **Generate** button.
3. When you return to the Peoplevox settings page, you'll see the **full Api key** populated.
9. Copy and paste the **Endpoint**.
10. Set **Tracking number format** as {returns}/{outbound}.
11. Click **Save**.
## 4. Set up DespatchPackage or Returns print templates in Peoplevox
1. Log in to your Peoplevox account.
2. Change the view to **Setup** (via dropdown at top-right of page).
3. Select **Print Templates**.
4. Select **Label type** as DespatchPackage (for outgoing labels and outgoing commercial invoices) or Returns (for returns labels and returns commercial invoices)
5. Click **Search**.
6. Click on your chosen template.
7. Set **Registered template name** as *Outgoing label, Commercial invoice, Returns label* or *Returns commercial invoice* (leave **Carrier connection**).
8. Click **Save**.
## 5. Select the print templates in the carrier connection in Peoplevox
1. Go back to the previously set up carrier integration via 3.2 and 3.3, above.
2. Click on it and then **Edit**
3. In the Document Types section at the bottom of the pop-up, set a **Name** and **Reference** and select one of the **Print Templates** created under section 4, above.
* The **Name** can be set to whatever you like, but you could just use the same text as the **Reference** (below).
* You must set the **Reference** as one of the following, depending upon the **Document Type** to be retrieved from Starshipit:
+ Outbound label
+ Commercial invoice
+ Returns label
+ Returns commercial invoice
* Initially, just set up the **Outbound label** Document Type, and test that it works, before proceeding with any further one.
4. Click **Save**.
## 6. Add a default courier and/or rules in Starshipit
Starshipit auto-generates labels for orders when they are despatched in Peoplevox. The correct courier and product code needs to be assigned to Peoplevox orders by default or using Starshipit's rules. To set this up:
1. In your Starshipit account, go to **Settings**, then select **Couriers.**
2. Add a default **International courier**and a **Domestic courier**, then click **Save**.
3. Open your default couriers and set a default product code for each.
4. (Optional) You can set up additional couriers in **Settings > Rules** and assign a courier and [product code based on different criteria](/articles/notifications-branded-tracking-rules-child-accounts/business-rules/rules-based-on-shipping-method).
## 7. Configure your package creation settings in Starshipit
Starshipit supports two settings for configuring how to create packages at despatch time:
* Create package using item weights from Peoplevox order
* Create packages using package details from Peoplevox orders
These can be configured in your Starshipit account settings under Settings > Integrations > Peoplevox as tickbox options.
**Create package using item weights from Peoplevox order**
This option will use the weight of your items to create a single shipment in Starshipit. The weights are pulled from the DespatchItems element submitted by Peoplevox to Starshipit.
**Create packages using package details from Peoplevox orders**
Each package added to a Peoplevox order will be created as a separate/separated order/shipment (with the same name / order number) in Starshipit upon despatch. Each order's tracking number will flow back into Peoplevox against the sales order.
* If the Package Name in Peoplevox matches a package name in Starshipit (for example, Light Box), Starshipit uses the dimensions from that Starshipit package when dispatching.
* If the Package Name does not match any Starshipit package, Starshipit uses the dimensions sent from Peoplevox for that package.
* If no Package_type (package name) is submitted from Peoplevox, Starshipit uses the dimensions of your default package set in Starshipit.
To make sure orders use the right carton sizes, keep your package names aligned between Peoplevox and Starshipit and set a sensible default package.
Both the weight and dimensions of each package will be used by Starshipit to create each order.
* If your Peoplevox orders contain multiple packages, you can consolidate them into a single shipment. To enable: Go to **Settings > Integrations > Peoplevox** and select **Consolidate multi-packages into one shipment**.
## 8. Label generation failures
On despatch of an order in Peoplevox, if the order still has an invalid address (and hasn't yet been corrected in Starshipit), the labels and tracking numbers will not be generated in Starshipit.
Peoplevox will then output a failover label which will let you know which order has failed label generation.
In this case, **correct the address in Starshipit** and reprint in Peoplevox, by **finding the despatch**, clicking **Print** and clicking the **Print** button next to the package.
## Troubleshooting
Most issues will be due to address errors or other errors from couriers directly. When an order fails to print, a failover label will be printed by Peoplevox.
For these cases the customer will need to **correct the address in Starshipit** and reprint in Peoplevox, by **finding the despatch**, clicking **Print** and clicking the **Print** button next to the package.
For all other issues the **Event Logs** in Peoplevox is a good place to check for any errors. The Event Log will also include API requests made to Starshipit by Peoplevox, and API responses from Starshipit.
To access the Event Log:
1. Login to Peoplevox
2. In the top-right of the screen, change the view to **Integration****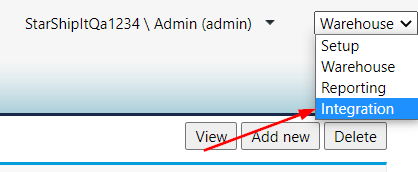**
3. Select the **Event Logs** tab on the top-left of the screen.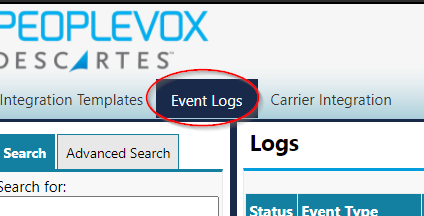
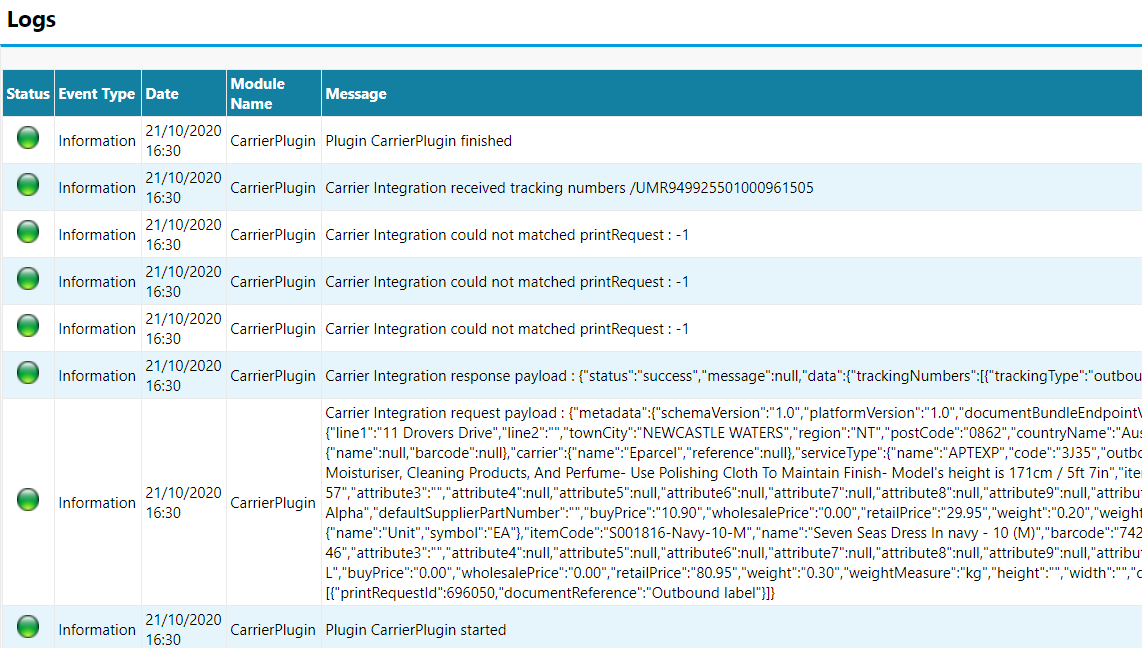
4. All event logs will be shown. See the example below.
:::note
In the Event Log a common message which displays "Carrier Integration could not matched print Request: - 1", this message is quite common and can usually be ignored.
:::
:::note
In the event that you need to re-import orders from Peoplevox to Starshipit, as Playvox sends orders directly into Starshipit, if you have removed/deleted orders, you will need to resend these from the Peoplevox side.
:::
## FAQ
Can I write the service used to print an order in Starshipit back to PeopleVox?
Yes. Starshipit allows sending the service type back to PeopleVox when printing an order. This feature updates the carrier in PeopleVox based on outbound references set up for each service.
1. **Set up Services in PeopleVox**: Ensure each Starshipit service is configured in PeopleVox with the corresponding outbound reference.
2. **Set the outbound reference**: Use the format `_`. In Starshipit, go to **Settings > Integrations > PeopleVox > Tools** to find the correct reference.
3. **Enable the setting**: In Starshipit, go to **Settings > Integrations > PeopleVox**, scroll to the bottom, and enable **Write back service type to PeopleVox**.
For example, if a rule in Starshipit changes the shipping method from Hermes to Royal Mail TPNN, `39_TPNN` is sent as the service type when you print. PeopleVox then updates the carrier using that outbound reference.
:::note
If PeopleVox does not find a matching reference, it marks the carrier as `unknown`.
:::
I updated the shipping address in PeopleVox before dispatch. Why is it not reflected in Starshipit?
By default, when an order is created in PeopleVox, it is immediately pushed to Starshipit and dispatch updates the items then prints the order. However, Starshipit does not receive any updates to the order (including address changes) made in PeopleVox after the order is created but before it is dispatched. This means any changes made during that window will not be reflected in Starshipit.
To have the order created on dispatch, allowing you to update the PeopleVox order as much as you'd like prior to printing:
1. In Starshipit, navigate to **Settings** > **Integrations** > **PeopleVox Settings**.
2. Disable the subscription.
With this setting disabled, orders will only be created in Starshipit at the point of dispatch from PeopleVox. This allows you to make any necessary changes (like address updates) in PeopleVox prior to dispatch, and those changes will be included when the order is sent to Starshipit for printing.
Can I use the Product Catalogue with PeopleVox?
Yes, the settings you enable for the [Product Catalogue](/articles/integrations/product-catalogue/product-catalogue) will apply to your PeopleVox orders when you dispatch the label
How does the Consolidate multi-package feature work?
With this setting, instead of immediately providing the label to Peoplevox upon receiving a dispatch request, Starshipit will keep updating the unshipped order with new packages. This will continue until the `totalPickedItems` match the `totalDespatchedItems`. Once they match, the label(s) will be generated and sent to Peoplevox.